How to Thread a Sewing Machine the Right Way (2026)
Most stitch problems start with threading. Every home machine follows the same basic path from spool to needle, and two simple habits prevent most tangles. Here is the full process, step by step.
In This Article
Threading in Brief
- Raise the presser foot to open the tension discs
- Raise the needle to its highest point with the handwheel
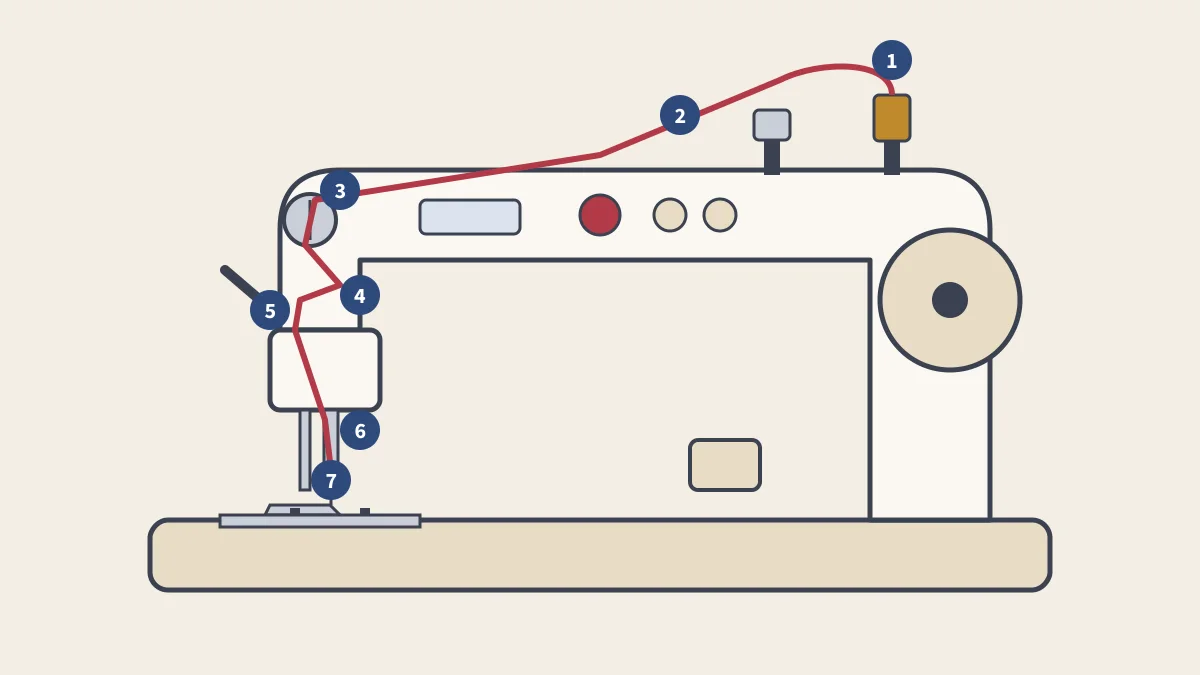
- Follow the path: spool, guide, tension discs, take-up lever, needle bar guide, needle
- Bring up the bobbin thread and place both tails toward the back
Threading a sewing machine looks complicated the first time, with numbered guides and arrows printed on the machine. But nearly every home machine follows the same route, and most machines print the path right on the body. Once you understand why each stop matters, you can thread any machine, and you will understand most stitching problems before they happen.
Before You Start
- Turn the machine off if you are working near the needle, especially on computerized machines.
- Raise the needle to its highest position by turning the handwheel toward you, or by using the needle up/down button. The take-up lever should also be at its highest point, so the thread can catch in it.
- Raise the presser foot. With the presser foot raised, the upper tension discs open; with it lowered, they close. Thread must slide between the open discs to be tensioned properly.
- Check your manual. The path below is typical, but each machine has its own guides.
Threading the Upper Thread Step by Step
- Place the spool on the spool pin. On a horizontal pin, add the spool cap that fits the spool. Many manuals specify which way the thread should come off the spool, so check yours.
- Pass the thread through the first thread guide on top of the machine, usually near the spool.
- Bring the thread down the right-hand channel on the front of the machine, passing between the tension discs. Holding the thread gently near the spool helps it seat between the discs.
- Bring it up the left-hand channel toward the take-up lever.
- Hook the thread into the take-up lever, passing it from right to left through the slot or eyelet at the top of the lever. Look to confirm the thread is actually in the lever.
- Bring the thread down through the remaining guides, including the small guide on the needle bar just above the needle.
- Thread the needle, usually from front to back, and pull through about 6 inches (15 cm) of thread. Use the built-in needle threader if your machine has one.
Raising the Bobbin Thread
With a full bobbin inserted (see how to wind a bobbin), you need to pull the lower thread up through the needle plate:
- Hold the end of the upper thread loosely in your left hand.
- Turn the handwheel toward you one full turn, so the needle goes down and comes back up.
- Gently pull the upper thread. It brings up a loop of bobbin thread through the needle plate.
- Pull the loop out with your fingers or the tip of scissors, then lay both thread tails under the presser foot and toward the back of the machine.
Many newer machines have a "quick bobbin" or drop-in system that does not need this step: you pull the bobbin thread through a slot and cut it, and the first stitch picks it up automatically.
Inserting the Bobbin
| Bobbin System | How to Load It |
|---|---|
| Top-loading (drop-in) | Remove the clear cover, drop the bobbin in with the thread unwinding in the direction shown on the plate (often counterclockwise), guide the thread through the slot, then replace the cover. |
| Front-loading | Open the access door below the needle, remove the bobbin case, insert the bobbin so the thread runs through the tension spring slot, then click the case back in with its finger in the notch. |
| Vintage shuttle | Insert the bobbin into the shuttle and thread the shuttle's tension spring as shown in the manual. |
Use only the bobbin type your machine is designed for. Similar-looking bobbins are not always interchangeable; see bobbin types and classes.
Common Threading Mistakes
| Mistake | What Happens | Fix |
|---|---|---|
| Presser foot down while threading | Thread misses the tension discs; loops and nests under the fabric | Rethread with the foot raised |
| Thread missed the take-up lever | Large loops under the fabric, immediate jamming | Rethread with the needle at its highest point and check the lever |
| Thread caught on the spool notch | Thread snaps or tension jumps | Turn the spool so the notch is away from the thread, or use a spool cap |
| Needle threaded from the wrong side | Skipped stitches or breaking thread | Thread along the long groove, usually front to back |
| Bobbin in backward | Poor stitches or tangling underneath | Check the direction shown on the bobbin cover or manual |
| Thread tails not held at the start | Thread pulled into the bobbin area, small nest at the start | Hold both tails toward the back for the first few stitches |
When to Rethread
Rethread the whole upper path, not just the needle, whenever stitches suddenly look wrong, the thread breaks, or a nest forms under the fabric. It takes under a minute and fixes a surprising share of problems. If rethreading does not help, work through our guide to common sewing machine problems, and check that the needle suits your fabric in sewing machine needles.
Sources
- Sewing machine, Wikipedia
Frequently Asked Questions
Should the presser foot be up or down when threading?
Up. Raising the presser foot opens the tension discs so the thread can slip between them. If you thread with the foot down, the thread may miss the discs, and the upper thread will have little or no tension.
Why does my thread bunch under the fabric?
A nest of thread under the fabric is almost always an upper-thread problem: the machine was threaded with the presser foot down, the thread missed the take-up lever, or it jumped out of a guide. Rethread the top thread completely with the presser foot up.
Which way do you thread a sewing machine needle?
Most home machines thread from front to back, but some older machines thread from left to right or right to left. The long groove on the needle shows the direction: the thread runs down the groove into the eye.
How do you bring up the bobbin thread?
Hold the upper thread loosely, turn the handwheel toward you so the needle goes down and comes back up, then pull the upper thread gently. A loop of bobbin thread comes up through the needle plate; pull it out and put both threads under the presser foot toward the back.
Keep Reading
How to Wind a Bobbin
Steps for modern and vintage machines, plus fixes for lumpy bobbins.
Parts of a Sewing Machine
A labeled diagram and what every part of the machine does.
Common Sewing Machine Problems
Thread nests, skipped stitches, broken needles and feeding faults fixed.
Stitch Length and Tension Explained
What the dials mean, common settings, and how to balance tension.