Stitch Length and Thread Tension: A Clear Guide (2026)
Two dials decide how every seam looks: stitch length and thread tension. Set them well and seams lie flat and strong. Here is what the numbers mean, the settings for common jobs, and how to read a stitch that has gone wrong.
In This Article
The Short Version
- Stitch length is how far the fabric moves between stitches, usually in millimeters
- Typical straight stitch: about 2.5 mm, or about 10 stitches per inch
- Tension controls how tightly the upper thread is held as it feeds
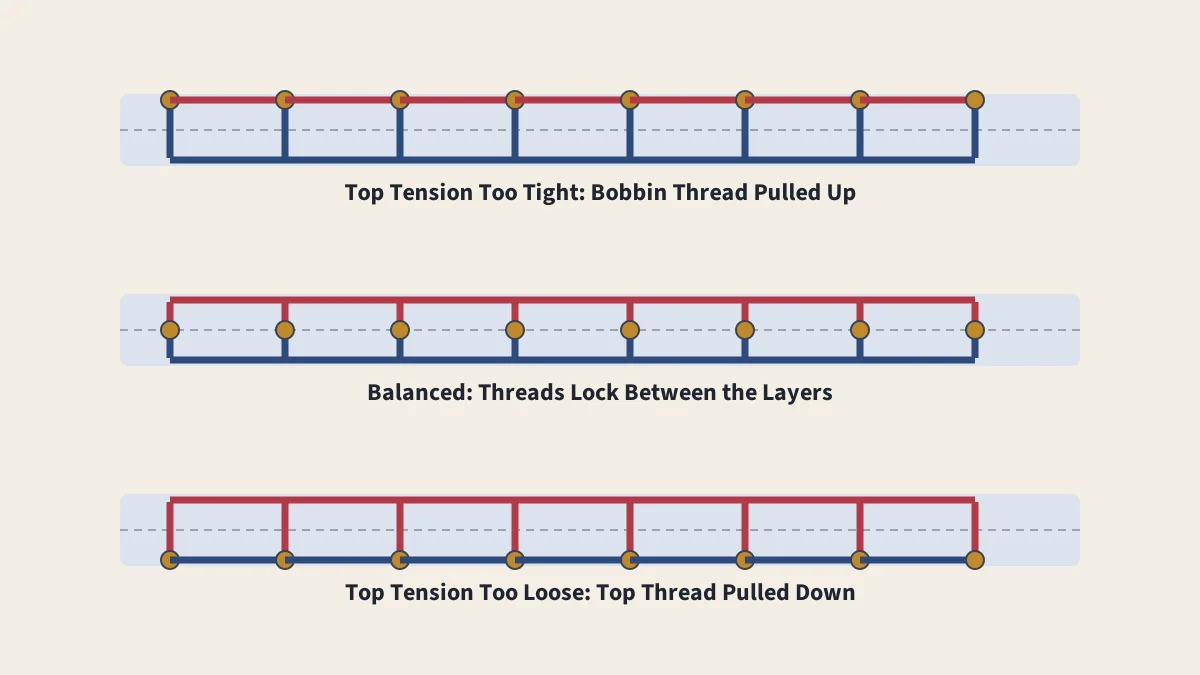
- Balanced tension: the threads lock inside the fabric
- Fix order: rethread, change the needle, then adjust the upper tension
Stitch length and tension work together. Length sets how big each stitch is; tension sets how tightly the two threads pull against each other. Most of the time your machine's default settings are fine, but knowing how to change them helps you sew everything from sheer silk to denim, and tells you what is wrong when stitches look odd.
Stitch Length
Stitch length is the distance the feed dogs move the fabric between one stitch and the next. Most modern machines show it in millimeters, often from 0 to 4 or 5 mm. Some older machines are marked in stitches per inch (SPI) instead, which works the other way round: more stitches per inch means a shorter stitch. To convert, divide 25.4 by the length in millimeters.
| Length | Approx. Stitches per Inch | Use It For |
|---|---|---|
| 1.0–1.5 mm | 17–25 | Reinforcing corners and points, very fine fabrics, staystitching tight curves |
| 2.0 mm | About 13 | Lightweight fabrics, small curves, quilt piecing |
| 2.5 mm | About 10 | General seams in medium-weight fabric |
| 3.0–3.5 mm | 7–8.5 | Heavier fabrics, topstitching, understitching |
| 4.0–5.0 mm | 5–6 | Basting, gathering, easing |
Shorter stitches are stronger and more flexible on curves, but very short stitches are hard to unpick and can weaken thin fabric. Longer stitches are easy to remove and look bolder on topstitching. In garment factories, stitch density is planned carefully: thread maker Amann notes that increasing a lockstitch from 4 to 6 stitches per centimeter raises thread consumption by about 15 percent.
Stitch Width
Stitch width controls how far the needle swings from side to side, for zigzag and decorative stitches. A width of 0 gives a straight stitch. For a zigzag used to finish raw edges, a medium width and length (around 3 mm and 2 mm) is a common starting point; for a satin stitch, the length is set very short so the zigzags sit side by side.
What Thread Tension Does
A lockstitch locks the needle thread and the bobbin thread at every needle hole. Tension decides where that lock sits. The upper tension, set by the dial on the front or top of the machine, controls how tightly the tension discs grip the upper thread. The bobbin tension is set by a tiny screw on the bobbin case. When the two are balanced, the lock is hidden inside the fabric and the stitch looks the same on both sides. See how a sewing machine works for the full sequence.
Reading Your Stitches
| What You See | What It Means | Try This |
|---|---|---|
| Bobbin thread showing as dots on the top | Upper tension too tight, pulling the bobbin thread up | Rethread, then lower the upper tension a little |
| Top thread lying in loops underneath | Upper tension too loose, or the upper thread missed the tension discs or take-up lever | Rethread with the presser foot up, then raise the upper tension if needed |
| Fabric puckers along the seam | Tension too tight, stitch too long for the fabric, or wrong needle | Lower tension slightly, shorten the stitch, try a finer or sharper needle |
| Seam pops when stretched | Straight stitch on knit fabric | Use a stretch or narrow zigzag stitch and a jersey or stretch needle |
| Stitches look fine on one fabric but not another | Fabric thickness or stretch has changed | Test on a scrap of each new fabric |
How to Test and Adjust Tension
- Use contrasting threads. Put one color on top and a different color in the bobbin so you can see which thread is being pulled.
- Sew a test seam on two layers of the fabric you plan to use, at your chosen stitch length.
- Check both sides. Ideally, you see only the top color on top and only the bobbin color underneath.
- Adjust the upper tension in small steps, such as half a number at a time, and test again after each change. Higher numbers usually mean tighter tension.
- Write down settings that work for fabrics you sew often.
- Return to the default when you go back to ordinary fabric.
What About the Bobbin Tension?
Bobbin tension is set at the factory and rarely needs changing. If your manual allows it, and only after rethreading, changing the needle and checking the bobbin, tiny turns of the screw on the bobbin case adjust it: clockwise to tighten, counterclockwise to loosen. Make very small turns, a fraction at a time. Many sewists keep a second bobbin case for specialty threads so the original stays at its factory setting. On drop-in machines, the bobbin tension is often best left to a technician.
Settings for Common Jobs
| Job | Stitch | Length | Tension |
|---|---|---|---|
| General seams | Straight | About 2.5 mm | Default |
| Quilt piecing | Straight | About 2.0 mm | Default |
| Topstitching | Straight | 3.0–3.5 mm | Default or slightly higher; topstitch needle for thick thread |
| Basting | Straight | 4.0–5.0 mm | Default or slightly lower |
| Gathering | Straight | 4.0–5.0 mm | Slightly lower |
| Knit seams | Stretch or narrow zigzag | As your manual suggests | Default |
These are starting points, not rules. Every machine, thread and fabric behaves a little differently, which is why testing on scraps is a habit worth keeping. When stitches still go wrong, our guide to common sewing machine problems walks through the other causes.
Sources
- Sewing machine, Wikipedia
Frequently Asked Questions
What is a normal stitch length?
About 2.5 mm, which many machines use as their default straight-stitch setting. That works out to about 10 stitches per inch. Use shorter stitches for fine fabric and tight curves and longer ones for basting, gathering and topstitching.
How do I convert stitch length in millimeters to stitches per inch?
Divide 25.4 by the stitch length in millimeters. A 2.5 mm stitch gives about 10 stitches per inch, and a 3 mm stitch about 8.5.
How do I know if my tension is balanced?
Sew a test seam with different colored threads on top and in the bobbin. On a balanced stitch, you see only the top color on top and only the bobbin color underneath, and the threads lock inside the fabric.
Should I adjust the bobbin tension?
Usually not. Most tension problems are fixed by rethreading and adjusting the upper tension dial. Change the bobbin case screw only if your manual says to, in very small turns, after ruling out everything else.
Keep Reading
Common Sewing Machine Problems
Thread nests, skipped stitches, broken needles and feeding faults fixed.
How a Sewing Machine Works
The lockstitch step by step: needle, hook, bobbin and feed dogs.
How to Thread a Sewing Machine
The thread path step by step, plus the habits that prevent tangles.
Sewing Machine Needle Sizes and Types
Needle sizes, types, color codes and when to change them.